Mastering the Art of Makeup Application: A Comprehensive Guide
Related Articles: Mastering the Art of Makeup Application: A Comprehensive Guide
Introduction
In this auspicious occasion, we are delighted to delve into the intriguing topic related to Mastering the Art of Makeup Application: A Comprehensive Guide. Let’s weave interesting information and offer fresh perspectives to the readers.
Table of Content
Mastering the Art of Makeup Application: A Comprehensive Guide
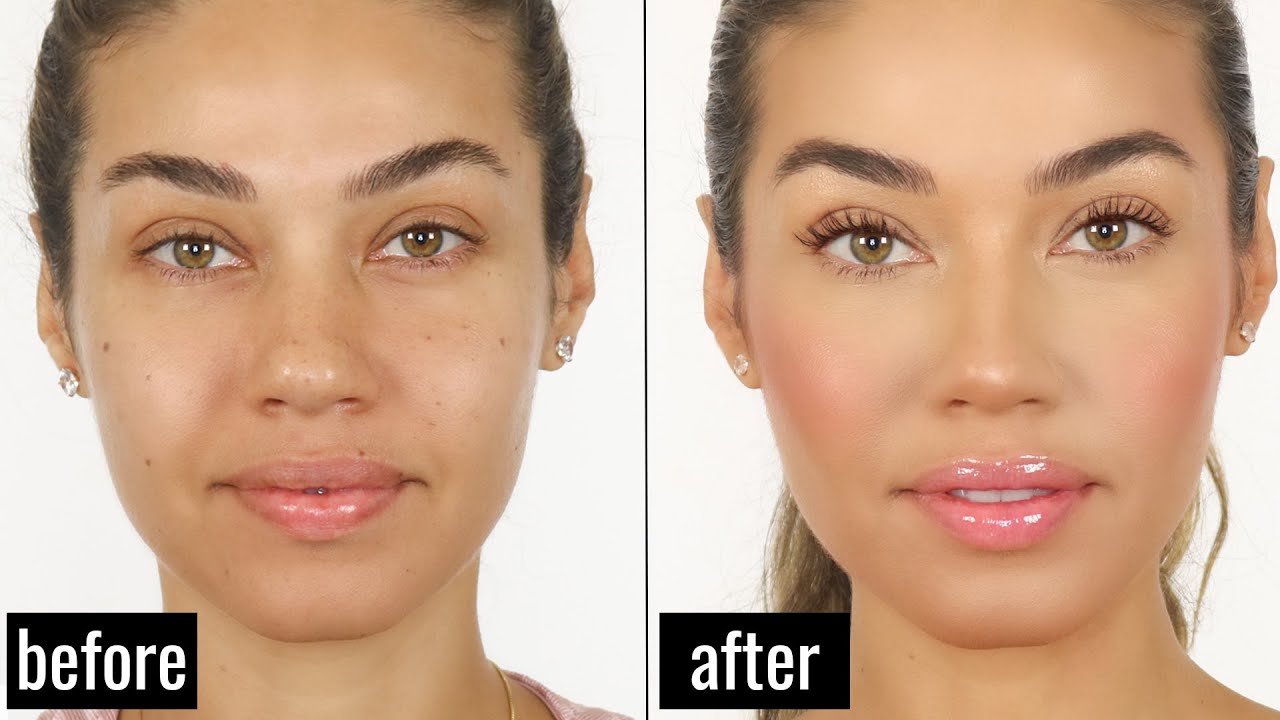
The art of makeup application transcends mere cosmetics; it is a creative process that empowers individuals to enhance their natural features, express their individuality, and boost their confidence. This comprehensive guide will delve into the intricacies of makeup application, providing a step-by-step approach to achieving flawless results.
1. Foundation: The Canvas for Your Look
Foundation serves as the base for any makeup application, providing an even complexion and creating a smooth surface for subsequent products.
- Choosing the Right Foundation: Selecting the correct foundation shade is paramount. Test foundation shades on your jawline, ensuring a seamless blend with your natural skin tone. Consider your skin type – oily, dry, combination, or sensitive – and choose a formula accordingly.
-
Application Techniques:
- Fingers: Warmth from fingertips allows for a natural blend.
- Beauty Blender: A damp sponge creates a flawless, airbrushed finish.
- Foundation Brush: Provides precise coverage and minimizes product waste.
- Setting with Powder: A light dusting of translucent powder sets the foundation and prevents creasing.
2. Concealer: Camouflaging Imperfections
Concealer effectively hides blemishes, dark circles, and hyperpigmentation, enhancing the overall look of the skin.
- Choosing the Right Concealer: Similar to foundation, select a shade that matches your skin tone or is one shade lighter to brighten under-eye areas. Opt for creamy formulas for concealing blemishes and lighter formulas for under-eye coverage.
-
Application Techniques:
- Triangle Technique: Apply concealer in an inverted triangle shape under the eyes, extending to the cheekbones, for a brightening effect.
- Dabbing Technique: Use a small brush or sponge to dab concealer onto blemishes for targeted coverage.
- Setting with Powder: Dusting a translucent powder over the concealer helps prevent creasing and ensures longevity.
3. Bronzer: Adding Dimension and Warmth
Bronzer sculpts the face, creating the illusion of depth and definition.
- Choosing the Right Bronzer: Opt for a shade that complements your skin tone and mimics a natural tan. Matte bronzers are ideal for everyday use, while shimmery bronzers add a subtle glow.
-
Application Techniques:
- Contouring: Apply bronzer to the hollows of the cheeks, temples, and jawline to create a sculpted look.
- Bronzing: Apply bronzer to the cheekbones, forehead, and nose bridge for a sun-kissed effect.
- Blending is Key: Use a large fluffy brush to blend the bronzer seamlessly for a natural finish.
4. Blush: Achieving a Healthy Flush
Blush adds a touch of color to the cheeks, mimicking a natural flush and enhancing the overall vibrancy of the face.
- Choosing the Right Blush: Consider your skin tone and desired effect. Pink and peach shades complement fair skin, while coral and berry shades are flattering on medium to olive skin tones.
-
Application Techniques:
- Apple of the Cheeks: Apply blush to the apples of the cheeks, blending outwards towards the temples for a natural flush.
- Contouring: Use a blush brush to apply blush along the cheekbones for a sculpted effect.
- Blending is Essential: Use a fluffy brush to blend the blush seamlessly for a natural finish.
5. Eyeshadow: Enhancing the Eyes
Eyeshadow enhances the eyes, adding color, depth, and definition.
- Choosing the Right Eyeshadow Palette: Select a palette that complements your eye color and desired look. Neutral shades are versatile for everyday wear, while bolder colors are perfect for special occasions.
-
Application Techniques:
- Base Shadow: Apply a light, neutral shadow to the entire eyelid as a base for other colors.
- Transition Shade: Apply a slightly darker shade to the crease of the eyelid, blending upwards towards the brow bone.
- Lid Color: Apply a bolder shade to the center of the eyelid, blending outwards towards the crease.
- Highlight: Apply a shimmery shade to the brow bone and inner corner of the eye for a brightening effect.
- Blending is Key: Use a fluffy brush to blend the eyeshadow seamlessly for a polished look.
6. Eyeliner: Defining the Eyes
Eyeliner defines the eyes, creating a sharper, more dramatic look.
- Choosing the Right Eyeliner: Consider your desired effect. Liquid eyeliner provides precise lines and a dramatic look, while pencil eyeliner is easier to apply and creates a softer effect.
-
Application Techniques:
- Winged Liner: For a dramatic effect, create a winged liner by extending the line outwards from the outer corner of the eye.
- Tightlining: Apply eyeliner to the waterline for a subtle definition.
- Smoky Eye: Apply eyeliner along the lash line and smudge it outwards for a smoky eye effect.
- Sharpness and Precision: Use a steady hand and a sharp eyeliner for a clean and precise application.
7. Mascara: Enhancing the Lashes
Mascara lengthens, volumizes, and defines the lashes, creating a more open and captivating eye look.
- Choosing the Right Mascara: Consider your lash type and desired effect. Volumizing mascara adds thickness, lengthening mascara creates length, and defining mascara separates and lifts lashes.
-
Application Techniques:
- Wiggle Technique: Wiggle the mascara wand from the base of the lashes to the tips for maximum volume and length.
- Layering Technique: Apply multiple coats of mascara for a dramatic effect.
- Avoiding Clumps: Use a lash comb to separate and define lashes after applying mascara.
8. Lipstick: Adding a Touch of Color and Glamour
Lipstick adds a touch of color and glamour to the lips, enhancing the overall look and expressing personal style.
- Choosing the Right Lipstick: Consider your skin tone, personal style, and the occasion. Nudes and pinks are perfect for everyday wear, while reds and berries are ideal for special occasions.
-
Application Techniques:
- Lip Liner: Use a lip liner to define the lips and prevent lipstick from bleeding.
- Lipstick Application: Apply lipstick to the center of the lips and blend outwards towards the corners.
- Blotting and Touch-Ups: Blot the lips with a tissue to remove excess lipstick and prevent it from smudging. Reapply lipstick as needed throughout the day.
9. Setting Spray: Locking in the Look
Setting spray seals the makeup, ensuring longevity and preventing it from fading or smudging.
- Choosing the Right Setting Spray: Opt for a setting spray that is appropriate for your skin type and desired effect. Matte setting sprays are ideal for oily skin, while dewy setting sprays create a luminous finish.
- Application Techniques: Hold the spray bottle 6-8 inches away from your face and mist your entire face in a “T” shape. Allow the spray to dry completely before applying any additional products.
FAQs by Makeup in Order How to Apply
1. Foundation:
-
Q: What is the difference between a matte and dewy foundation?
- A: Matte foundations provide a flat, shine-free finish, while dewy foundations create a luminous, radiant look. Matte foundations are ideal for oily skin, while dewy foundations are better suited for dry or normal skin.
-
Q: How do I choose the right foundation shade for my skin tone?
- A: Test foundation shades on your jawline, ensuring a seamless blend with your natural skin tone. Avoid testing on the back of your hand, as the skin tone may differ from your face.
2. Concealer:
-
Q: How do I conceal dark circles effectively?
- A: Use a concealer that is one shade lighter than your skin tone and apply it in an inverted triangle shape under the eyes, blending outwards towards the cheekbones.
-
Q: What is the difference between a cream and liquid concealer?
- A: Cream concealers provide more coverage and are ideal for concealing blemishes, while liquid concealers are lighter and more suitable for under-eye coverage.
3. Bronzer:
-
Q: How do I avoid looking orange when using bronzer?
- A: Choose a bronzer that is only one or two shades darker than your natural skin tone and blend it seamlessly for a natural finish.
-
Q: What is the difference between a bronzer and a contour powder?
- A: Bronzer is used to add warmth and dimension to the face, while contour powder is used to create shadows and define the features.
4. Blush:
-
Q: How do I apply blush to avoid looking clownish?
- A: Apply blush to the apples of the cheeks and blend it outwards towards the temples for a natural flush. Avoid applying too much blush, as this can create an unnatural look.
-
Q: What is the difference between a cream and powder blush?
- A: Cream blushes provide a more natural and dewy finish, while powder blushes are more pigmented and offer longer wear.
5. Eyeshadow:
-
Q: How do I choose the right eyeshadow colors for my eye color?
- A: Blue eyes are flattered by warm tones like browns, oranges, and golds. Green eyes pop with purple and berry shades. Brown eyes look stunning with cool tones like blues, greens, and purples.
-
Q: How do I create a smoky eye look?
- A: Apply a dark eyeshadow along the lash line and crease, blending it outwards for a smoky effect. Use a lighter shade on the brow bone for a brighter effect.
6. Eyeliner:
-
Q: How do I create a winged eyeliner look?
- A: Start by applying a line along the lash line and extend it outwards, creating a wing shape. Use a steady hand and a sharp eyeliner for a clean and precise application.
-
Q: What is the difference between a liquid and pencil eyeliner?
- A: Liquid eyeliner provides precise lines and a dramatic look, while pencil eyeliner is easier to apply and creates a softer effect.
7. Mascara:
-
Q: How do I avoid clumpy mascara?
- A: Use a lash comb to separate and define lashes after applying mascara. Avoid pumping the mascara wand, as this can introduce air into the tube and cause clumping.
-
Q: What is the difference between volumizing and lengthening mascara?
- A: Volumizing mascara adds thickness to the lashes, while lengthening mascara creates length.
8. Lipstick:
-
Q: How do I choose the right lipstick shade for my skin tone?
- A: Fair skin looks great in pinks and light reds. Medium skin tones can wear a wider range of colors, including corals, berries, and plums. Dark skin tones can rock bold reds, browns, and deep plums.
-
Q: How do I prevent lipstick from bleeding?
- A: Use a lip liner to define the lips and prevent lipstick from bleeding.
9. Setting Spray:
-
Q: What is the difference between a matte and dewy setting spray?
- A: Matte setting sprays are ideal for oily skin, while dewy setting sprays create a luminous finish.
-
Q: How often should I use setting spray?
- A: You can use setting spray every day, or just when you want your makeup to last longer.
Tips by Makeup in Order How to Apply
- Always Start with Clean Skin: Ensure your skin is cleansed, toned, and moisturized before applying any makeup.
- Practice Makes Perfect: Mastering makeup application takes time and practice. Don’t be afraid to experiment with different techniques and products to find what works best for you.
- Invest in Quality Brushes: High-quality brushes are essential for achieving a flawless finish.
- Use Natural Lighting: Apply makeup in natural lighting to ensure accurate color matching and blending.
- Less is More: Start with a light application of makeup and build up coverage as needed.
- Blend, Blend, Blend: Seamless blending is the key to a natural and polished look.
- Remove Makeup Before Bed: Always remove your makeup before going to bed to prevent clogged pores and breakouts.
Conclusion by Makeup in Order How to Apply
Mastering the art of makeup application is a journey of self-discovery and expression. By understanding the steps involved, choosing the right products, and practicing diligently, individuals can unlock their full potential and create looks that enhance their natural beauty, boost their confidence, and reflect their unique style. Remember, makeup is a tool for empowerment, allowing individuals to showcase their individuality and embrace their inner beauty.


Closure
Thus, we hope this article has provided valuable insights into Mastering the Art of Makeup Application: A Comprehensive Guide. We appreciate your attention to our article. See you in our next article!